DIY: Gallery Wall

Since we moved I’ve been telling my husband that I want a gallery wall. We debated back and forth over which wall we’d want all of our pictures on. When we finally decided and I had a free hour I started on the project.

What you’ll need:

Scissors
Frames, pictures, quotes, canvases, etc…
Marker or pen
Large paper (I used leftover paper table cloth from our wedding, this stuff has lasted us two years since our wedding. It won’t hurt to use a little for this project. But you can use whatever you have one hand, newspaper, printer paper, etc. It only needs to be as large as your biggest frame & you can even piece together a couple pieces of paper if need be.)

image

Not pictured:
Tape (masking tape or painters tape is best)
Nails
Hammer

1. Lay out your paper on a falt surface. (I spread out on the floor so I would have enough room). Arrange you frames on the paper in a way that they will fit best and use the least amount of paper (if your concerned about that). Trace around your frames & canvases. It doesn’t need to be exact. Make a note on each shape as to what photo it is & put an arrow so you know was orientation the paper needs to be.

image
image

2. Cut out all of your outlines. Like I said before it doesn’t need to be perfect. This is just to give you an idea of the arrangement on the wall.

3. Hang it up your templates. Get it all up on the wall. Rearrange it however many times you like. Change which wall you’d like it on, like us. This is when we realized that our arrangement didn’t fit how we’d like it on the wall we wanted. So we picked a different one and then a third one.

(So I totally took a picture of this, but there’s not a lot if light in our living room where we ended up hanging our frames & my husband was rushing me to just hang up the frames already. I had left the templates up for 2 days to make sure we would like it there.)

4. Hang up your frames. If you’d like leave the paper on the wall while you put your nails in, then just rip the paper off. (When I went to hang up our frames I found out that I had the direction for one of the big 16×20″ pictures wrong & that it wouldn’t fit where I had it anymore. So, we decided that three 16×20″ pictures might be a little much and took down two. Since I had already started putting nails in the wall there wasn’t much else we could do.)

5. Step back and enjoy your awesome gallery wall. I will totally get you a picture of our gallery wall, I just wanted to wait for the sun to be up so there’d be some decent lighting.

20131104-072955.jpg

XOXO

DIY: 1-Hour $10 Wreath

So I must start off by apologizing that I forgot to take pictures if the first half of this project, but I think you’ll be able to follow along just fine.

Is it just me or are wreaths THE thing this fall? Everywhere I turn I see several with varying ways to do them & styles. Since we moved to the new house I’ve been going on and on to the DH about how I wanted to make a wreath for our door. Our front door is actually French doors, so I thought the door on the left would be perfect to put a wreath on and not have to worry about it banging against the door every time it was opened or closed.

We don’t have kids to be able to call this a naptime project, but it definitely is. I think it took me an hour total, including hanging on the front door.

So here we go. My $10 wreath tutorial.

Cover-Photo

What you’ll need:

1 large vine wreath (mine is 16 inches)

Some fake flowers (I used the wax kind that I had laying around)

An initial letter (50% off with a coupon from Michaels)

Twine/ribbon

Hot glue gun & glue

Wire cutters

Scissors

Wreath hook/hanger

What to do:

1. Take your flowers and start sticking them in your wreath. Cut the wire stem to 1-2″ once it is through the wreath and fold that over to hold it in place. This isn’t complicated & there is no perfect way to arrange them.

2. Once you have your flowers on, plug in your hot glue gun. Now is the time to grab that initial letter and figure out how you’d like it placed. I put mine on the opposite side of my flowers with a little tilt to it.

3. Hot glue the initial letter in place. Hot glue the stems that you folded over in place, just by running a line of glue accross them should do. I also added a little glue to the ends of all the stems so there’s nothing sharp or pointy to scratch my door.

4. Tie the twine or ribbon around your letter. I took two strings of twine and tied them in a regular double knot, but you definitely could get fancy and do a big bow with some ribbon or some fancy boy scout knots with twine. Whatever suits your fancy.

5. Place the wreath hanger over the top of the door and set your awesome new wreath creation on the hook. Stand back and enjoy.

A little bit of a change

Since we are now actually living in the house instead of just working on it, you’re going to notice a little bit of a change around here.

First, the post won’t be titled with the weeks any more. It just feels a little weird to say Week 6 we lived in our house. Lol.

Second, there’s going to be a lot more DIY projects as to decorating as opposed to repairs being made. Right now our goals have switched.

All the repairs that needed to be made to live in the house have been done, so our focus is on making it home. Youu know, that place you walk in and instantly want to kick off your shoes and lounge on the couch

There’s nothing that makes a house feel like a home better than an air freshener. So we’ve been experimenting with a couple different kinds to see what works the best & what we want our home to smell like when you drop by for a cup of coffee. Ir you remember, when we got the keys to the house it smelled if mice & urine. So we immediately purchased a couple extra air fresheners & put them in the house. The DH and my loving in-laws love to clean with bleach & while that’s fantastic & I love the cleaning powers of bleach, I’m not a fan of the smell left behind. Now that we are living in the house, it’s a little different. We need something that gets rid of the smell of the garbage that was supposed to go out yesterday, the dusty boxes that we are still unpacking, the musty smell of wet towels thrown in the laundry basket with dirty clothes (I love you baby).

First, we tried these.


You know you twist them & the top pops up to reveal a colored gel substance? For areas, like the living room, kitchen & dining room, these didn’t even make a difference. But for small rooms, like the bathrooms this is perfect. I leave it sitting on the windowsill & it works so well.

Second, we tried these.


Just a can of air freshener. Sprayed it whenever we noticed a bad smell in the house. But, that was just it. I didn’t like that you had already noticed something smelling a little off before you sprayed this.

Third, we tried this.


Boy do I love this. It’s scented oil & somehow manages to make the house smell fantastic. They even have ones that smell like food (I’m thinking of holding on to those for when we have company & just out them on then). The only reason we ended up with this brand over the others was because this was on sale. It worked out cheaper than the others at the moment. I was worried that it’d burn super quick & we’d be spending all this money on refills, but it lasts, almost a month. So if it’s gonna cost me $4 a month to have my house smelling good, it’s worth it. Right now, we are stuck on this warm vanilla scent. It makes me want to bake.


Anyway, off to another day full of projects there isn’t enough time for.


XOXO


(This is not a sponsored post. All photos credit: walmart.com.)

Week 5

So I forgot to hit publish…

WE HAVE MOVED!!!

Yes, it’s complete. Every last box is now at the new house. It was a mad rush Friday/Saturday/Subday to finish it all,but we did it. And we managed to only forget a couple of things that can be replaced, like our clock and trashcan. We turned over the keys to the old house early Sunday afternoon.

So, what of the new house? What have we got done? Organizing chaos is the best answer. I’m still terrified that someone will just pop in to say hi & the house will be an utter disaster like it is now. But we are making progress everyday. For example, yesterday I found a solution for my closet & then hung up all my clothes only to discover they were too heavy for my solution. So the husband & I talked it out & came up with another solution, that we’ll try tonight. We also got the tv/entertainment area set up, the microwave set up & figured out where most of our stuff is going to go in the kitchen. Now, we just need to line the drawers & we can finish unpacking the kitchen.

We have a whole list of little things that need to be done & now instead of going to each new week with goals to complete we are just trying to get everything marked off the list.

ToDo:

    Line kitchen drawers with contact paper

    Line linen closet with contact paper (bare wood & fluffy towels don’t mix)

   Clean Stove (the weather has been nice so we’ve been enjoying some barbecue)

   Clean second shower

   Return all painting tools to dad

   Return all various other tools to dad

   Decide officially on the office/guest room/theater room situation

   Create wreath

    Unpack, unpack and unpack

Week 4

Holy crap!!! We’ve been working on the house for a full on month now. It’s amazing how time flies when your having fun (or just super busy). So our goals for week four got shifted around a little bit when our “two weeks until the close of escrow” deadline got bumped up to ESCROW WILL CLOSE IN TWO DAYS!!! Thankfully, our buyer has been very understanding and knows how busy we are.  By tomorrow night everything has to be out of the house though and I mean everything. Thanks to the help of some goods friends & family we were able to get two big truck loads moved last weekend. We were able to move our bed, the couches, the small tables (we have 4+ coffee tables/end tables) & some boxes. We’ve made loads in the car each day after work. It’s finally to the point that I see light at the end of the tunnel. The hardest part was how unprepared we were, nothing has been boxed or ready to go, since we thought we still had time we had just started packing.


Thanks to a donation from a loving aunt our ice maker is now fixed & will no longer be emptying ice into the freezer. (The bucket to the ice maker & the switch that made it stop making ice was stolen by the previous tenants, so it was making ice and it would fall through the shelves to the bottom of the freezer & in the shelves on the door. It was a weekly task to sit on the ground in front of the freezer, whack at all massive pile of ice, and put it in a bucket/bag/whatever was close.) Every time the ice maker would make ice it’d be this loud crashing sound (that scared us more than a few times) as the ice fell through all the shelves to the bottom of the freezer.


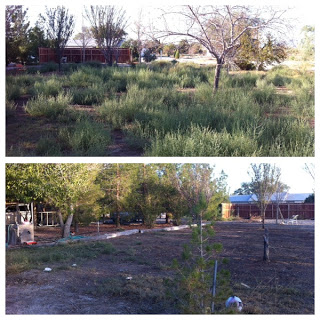
Besides packing & hustling our move, we did manage to get a few things done with some help. The sink in the guest bath is fully opperational now (water needed to be turned on, checked for leaks, hook up the drain stopper, etc), & the backyard actually looks like a yard now (sorta). Check out this before & after of the backyard. The top is the before & the bottom is the after, just in case you were wondering.


I can see the potential now! We can see what we’d like to do with it, since it’s almost a blank slate. The seed that we planted in the front yard is coming in beautifully and is just about ready to be cut for the first time.


The painting inside has come to a small stop as there are so many little things that need to be done to LIVE in the house.


For Week Five we have only one goal, get everything moved, the old house cleaned out & give the keys to our extremely eager buyer.


I’m off to find some more boxes to pack. Until next time. XOXO